

Custom OIDC is for end users signing in through Para with your IdP. If your backend already authenticates users and you only need server-side wallets, see Bring Your Own Auth instead — a different pattern.
How it works
- A user selects your provider on the Para login screen.
- Para redirects them to your IdP to sign in.
- Your IdP redirects back to Para’s callback with an authorization code.
- Para exchanges the code, verifies the identity, and creates or loads the user’s Para wallet.
Before you start
- An OpenID Connect provider that supports OIDC Discovery (it serves a
/.well-known/openid-configurationdocument). - Admin access to register a new client with that provider.
- A Para project and API key — create one if you haven’t.
One provider or several? This page sets up a single OIDC provider, which works on all current Para SDK versions. You can also register multiple OIDC providers as named connections — see Multiple OIDC providers below for how, and for the SDK version that requires.
1. Register Para with your provider
In your identity provider, register a new OIDC client (sometimes called an “application” or “relying party”) and note its Client ID and Client secret. Add both of Para’s redirect URIs to the client’s list of allowed redirect URIs. Sign-ins may use either one until all of your users are on the current Para SDK login flow:Para uses the same redirect URIs for every project in an environment — your project context is carried in the OAuth
state parameter. The exact URIs are also shown when you configure Custom OIDC in the next step.2. Configure Custom OIDC in Para
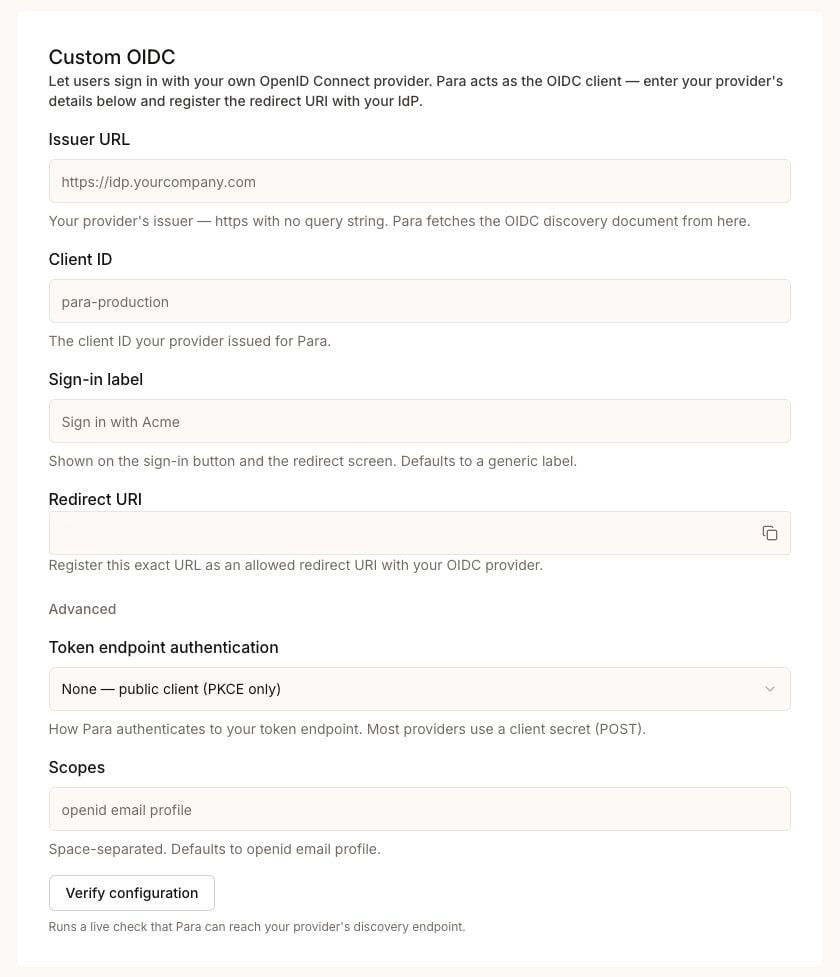
Configure the provider on your partner record from either the Developer Portal or the Para CLI — they write the same settings.- Developer Portal
- Para CLI
1
Open the Authentication screen
In the Developer Portal, select your project and API key, then go to Authentication and find the Custom OIDC section.
2
Enter your provider details
- Issuer URL — your provider’s issuer, e.g.
https://idp.yourcompany.com. Must behttpswith no query string. - Client ID — the client ID from step 1.
- Scopes — space-separated (defaults to
openid email profile). - Token endpoint authentication — how Para authenticates to your token endpoint (see authentication methods).
- Sign-in label — the text shown on the login button, e.g. “Sign in with Acme”.
3
Add your client secret
Enter the Client secret from step 1 and save it. It’s stored encrypted and never shown again. (Skip this if your client uses the
none authentication method.)4
Register the redirect URIs
Copy both Redirect URIs shown in the card and add them to your provider’s allowed redirect URIs (if you didn’t in step 1).
5
Verify
Click Verify — Para runs a live check against your provider’s discovery document and confirms it can reach it.
6
Enable Custom OIDC
In the Embedded Wallets method list, enable Custom OIDC so it appears as a login option.
3. Use it in your app
Once Custom OIDC is enabled, no extra SDK code is required to make it appear.With the Para Modal
The Para Modal renders a Custom OIDC button automatically, labeled with your sign-in label. Users tap it, sign in with your provider, and land back in your app with a Para wallet.With your own UI
If you build your own login UI, trigger Custom OIDC like any other OAuth provider — pass"CUSTOM_OIDC" as the method:
para.config.authConfig?.oidcConfig?.buttonLabel.
Custom OIDC works the same on every platform — it’s a
CUSTOM_OIDC OAuth method wherever Para authenticates. On mobile, follow your platform’s social-login guide and pass CUSTOM_OIDC as the method.Multiple OIDC providers
Beyond the single provider above, you can register several OIDC providers side by side — for example, one SSO per enterprise customer. Each one is a named connection with its own handle, credentials, and sign-in button. Add a connection from the Authentication screen with Add custom provider, choosing the OpenID Connect provider (the same fields as above, plus a Handle: a short lowercase slug likeacme-sso), or with the CLI:
https://api.getpara.com/internal/v1/auth/oauth/custom_oidc/callback in production (copy it from the connection dialog). If you move an existing single-provider setup to connections, keep the /auth/custom_oidc/callback URI registered with your IdP too: apps on older SDK versions continue to use it.
Token endpoint authentication methods
Token endpoint authentication controls how Para authenticates to your provider’s token endpoint when it exchanges the authorization code:
Choose the method your provider expects for the client you registered.
client_secret_post and client_secret_basic require a client secret; none requires none.
Security
- Your client secret is write-only. Para stores it with KMS envelope encryption and never returns it. The CLI prompts for it without echoing, and it’s never written to
.pararc. - The issuer must be
httpswith no query string — this keeps credentials out of the stored issuer and any logs. A path is fine (https://idp.yourcompany.com/tenant-123). - Para validates your provider’s discovery document over the network when it connects; private and internal addresses are rejected.
Troubleshooting
The redirect fails with a redirect_uri mismatch
The redirect fails with a redirect_uri mismatch
The redirect URIs registered with your provider must exactly match Para’s callbacks for the environment you’re using. Register both the
/auth/custom_oidc/callback and the /internal/v1/auth/oauth/custom_oidc/callback URI for https://api.getpara.com (production) or https://api.beta.getpara.com (beta); a sign-in fails on whichever one is missing. Re-copy them from the Custom OIDC configuration.Verify fails, or login errors at the token step
Verify fails, or login errors at the token step
Your token endpoint authentication method must match what your provider expects. If your client is confidential, use
client_secret_post or client_secret_basic and make sure a secret is set. If it’s a public client, use none.The Issuer URL is rejected
The Issuer URL is rejected
The issuer must be
https with no query string, fragment, or credentials — just https://host/path. Para fetches your discovery document from {issuer}/.well-known/openid-configuration.Verify says Para can't reach your provider
Verify says Para can't reach your provider
Para couldn’t load your discovery document. Confirm the issuer is publicly reachable over HTTPS and serves a valid
/.well-known/openid-configuration.